
How to use Baylock
Step-by-step guides for every role — from signing in for the first time to managing lockscreens, schedules and users across all your facilities.
Getting started
Everything in Baylock starts with an account. Accounts are created by an administrator — there is no self-service signup.
Logging in
- Navigate to the Baylock web application at baylock.se.
- Enter your email (or username) and password.
- Click "Sign in". You'll land on the dashboard that matches your role.
If you were invited by an administrator, your login credentials arrive in an invitation email sent to your address.
Forgot your password?
- Click "Forgot password" on the login page.
- Enter your account email — a password reset link is sent to your inbox.
- Follow the link and choose a new password, then sign in as usual.
Admins can also reset passwords for users directly, so you can always ask your administrator for help.
Your profile
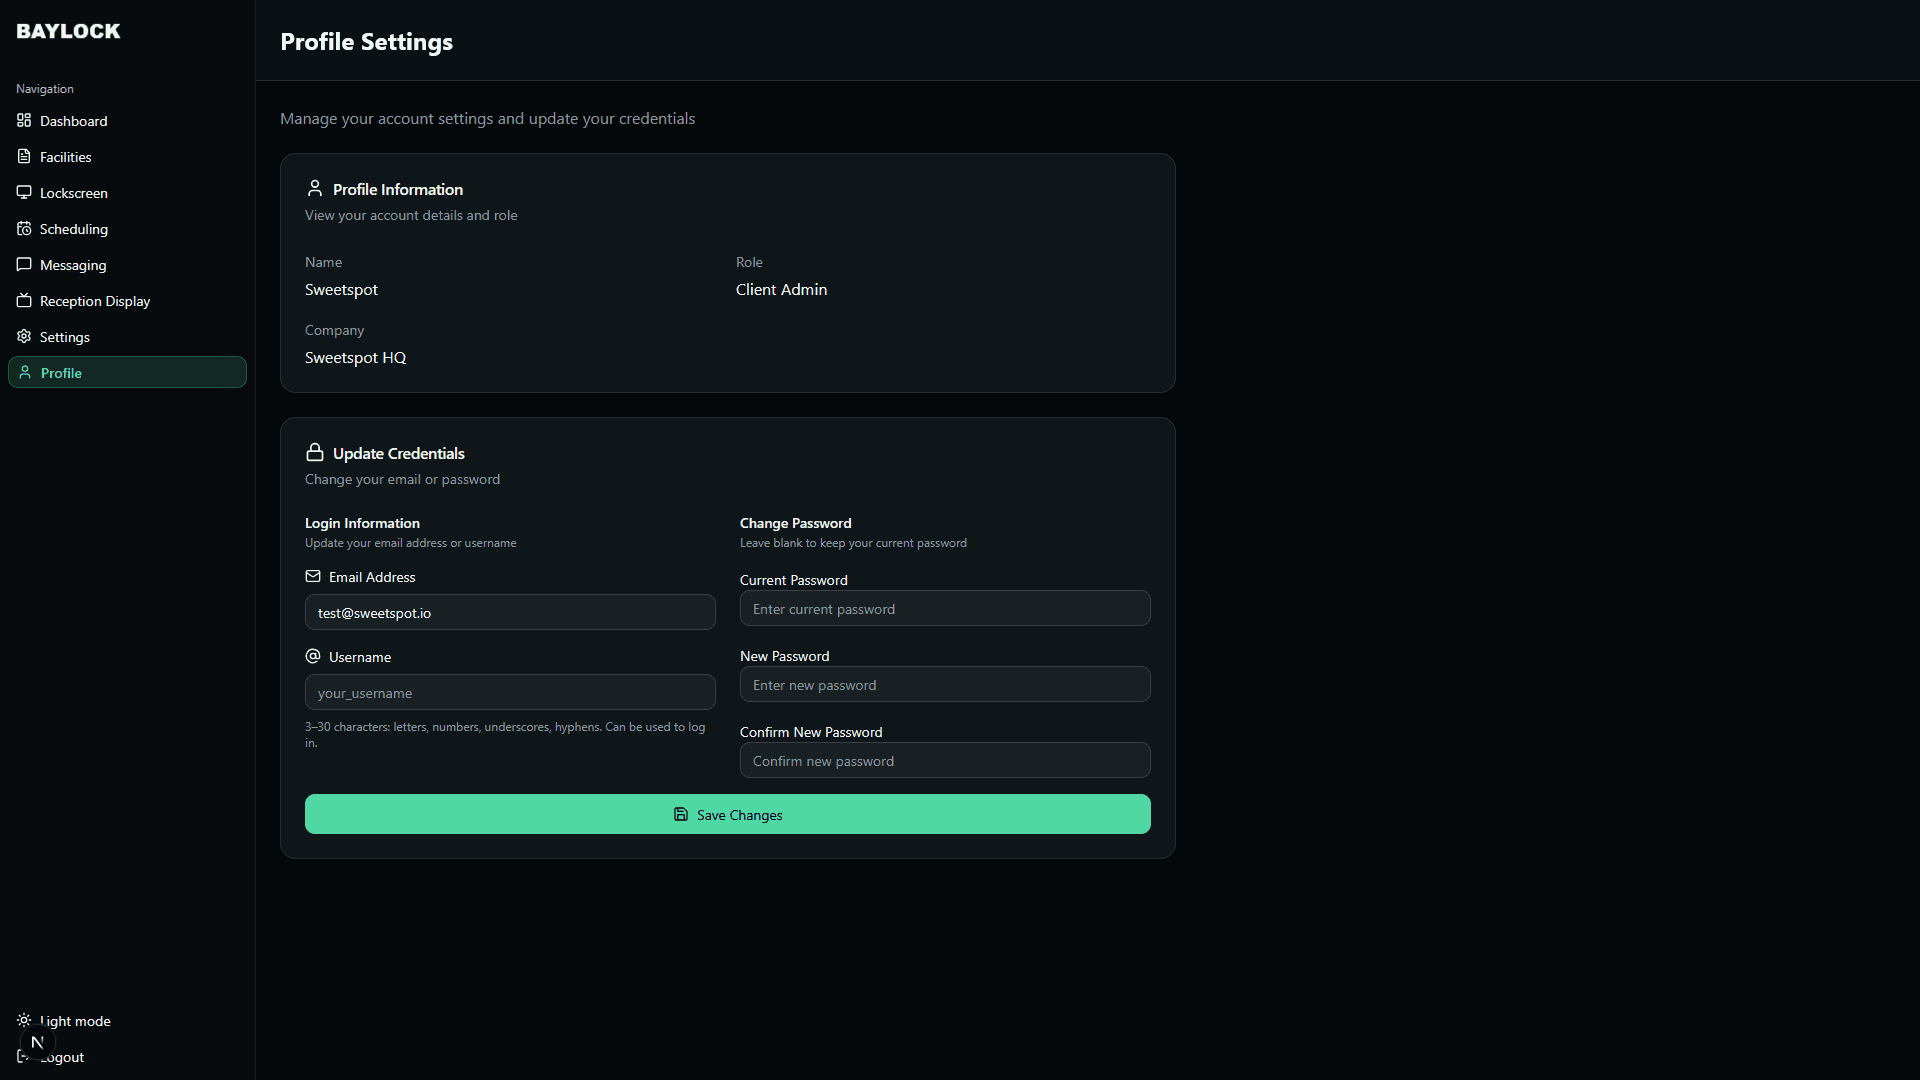
The Profile page (in the sidebar) is available to everyone. Use it to review your account details and role, and to update your email, username or password.
Finding your way around
All pages you have access to are listed in the sidebar on the left. The sidebar also holds the light/dark theme toggle and the logout button. What you see depends on your role — see the role guides below.
Roles overview
Baylock has three roles. Your role decides which pages appear in your sidebar and what you're allowed to change.
Facility staff
Day-to-day users at a facility. Can see the dashboard and live simulator status across their facilities.
Read the guide →Facility admin
Runs one or more facilities. Manages lockscreens, scheduling, messaging, the reception display and facility users.
Read the guide →Organisation admin
Owns the whole organization. Everything a facility admin can do, plus organization settings, all users and the Sweetspot integration.
Read the guide →Dashboard overview
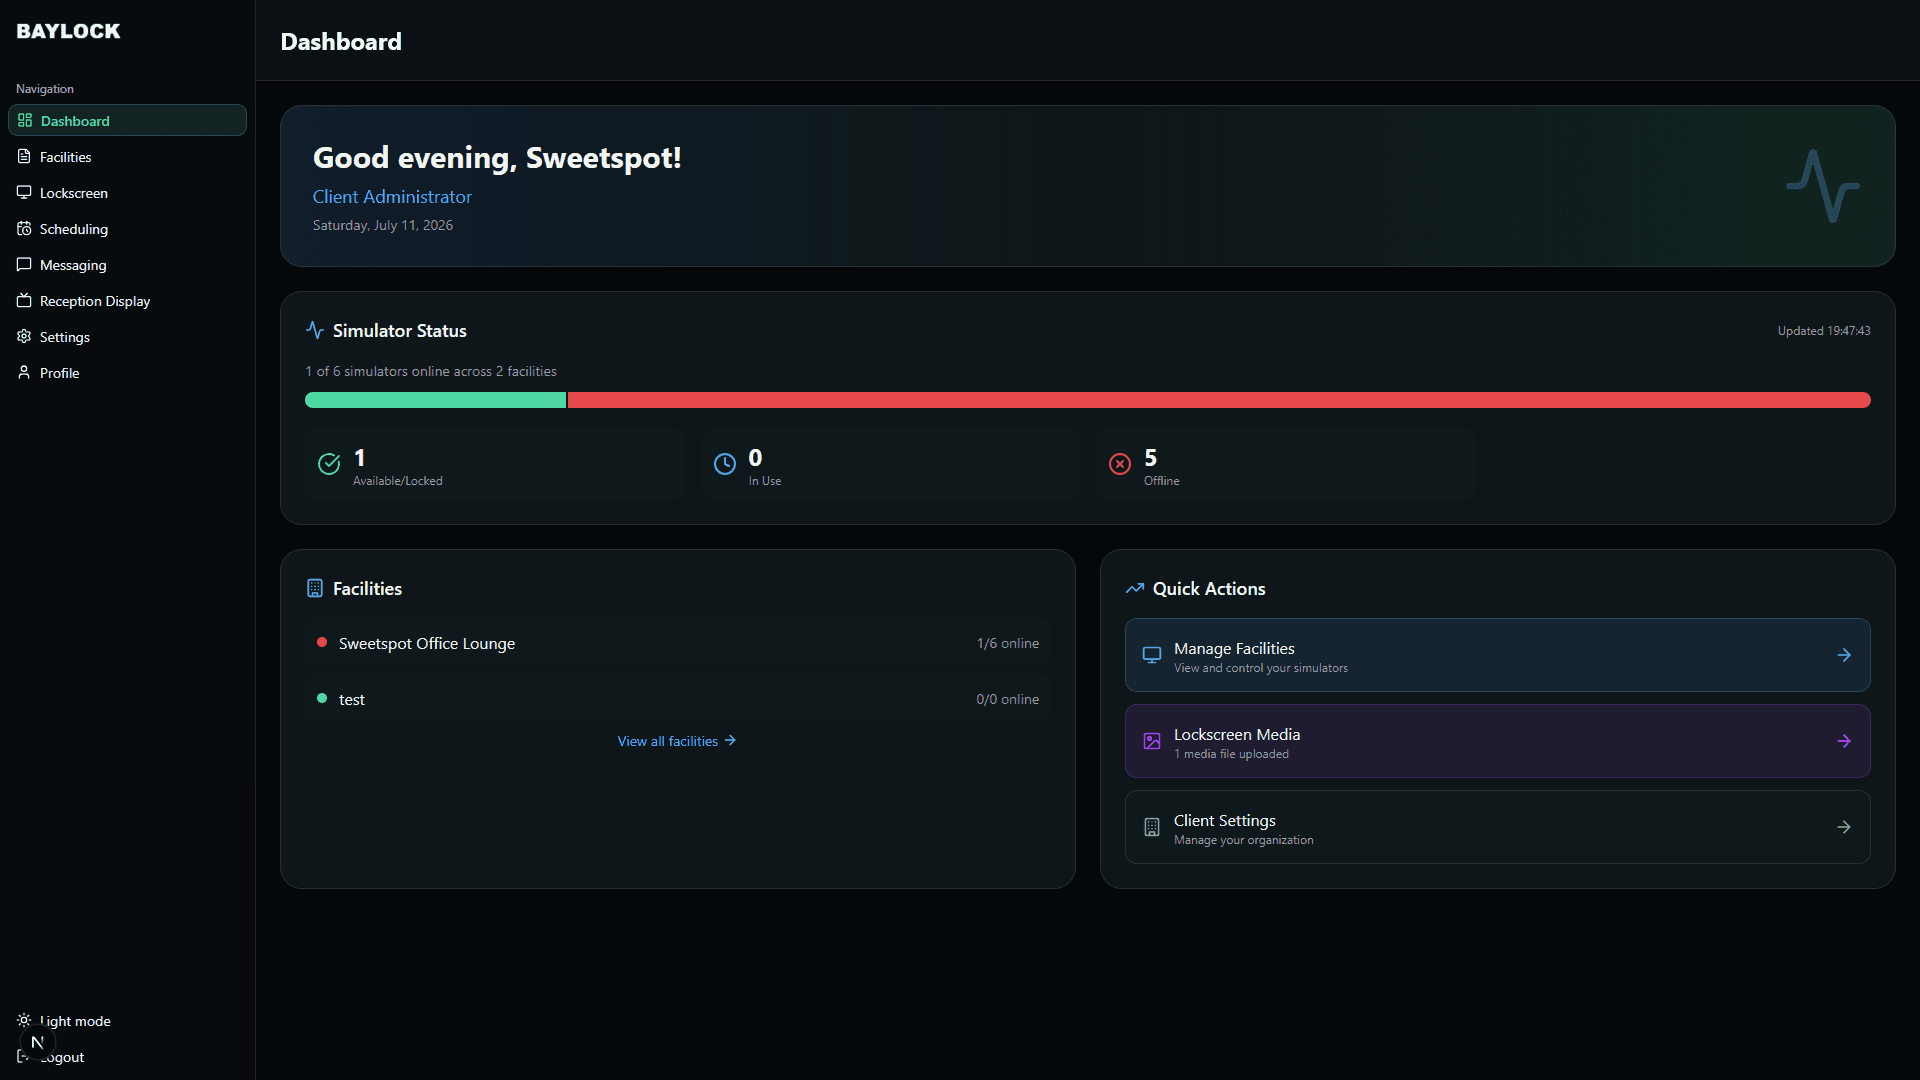
ALL ROLESThe dashboard is your central hub — an at-a-glance view of your organization's health and status.
Quick statistics
- Total facilities — the number of facilities assigned to your organization.
- Total simulators — the simulator count across all facilities.
- A status overview breaks the simulators down by their current state (see the legend).
Simulator status legend
- Available / Locked — Online — ready for booking, or manually locked by staff.
- In use / Booked — Currently active or occupied by a booking.
- Offline — The Baylock app on the bay PC is not connected to the server.
Quick actions
Shortcuts to navigate fast:
- Manage Facilities — jump to simulator controls.
- Lockscreen Media — jump to media uploads (admins).
- Client Settings — jump to organization configuration (organisation admins).
Facilities management
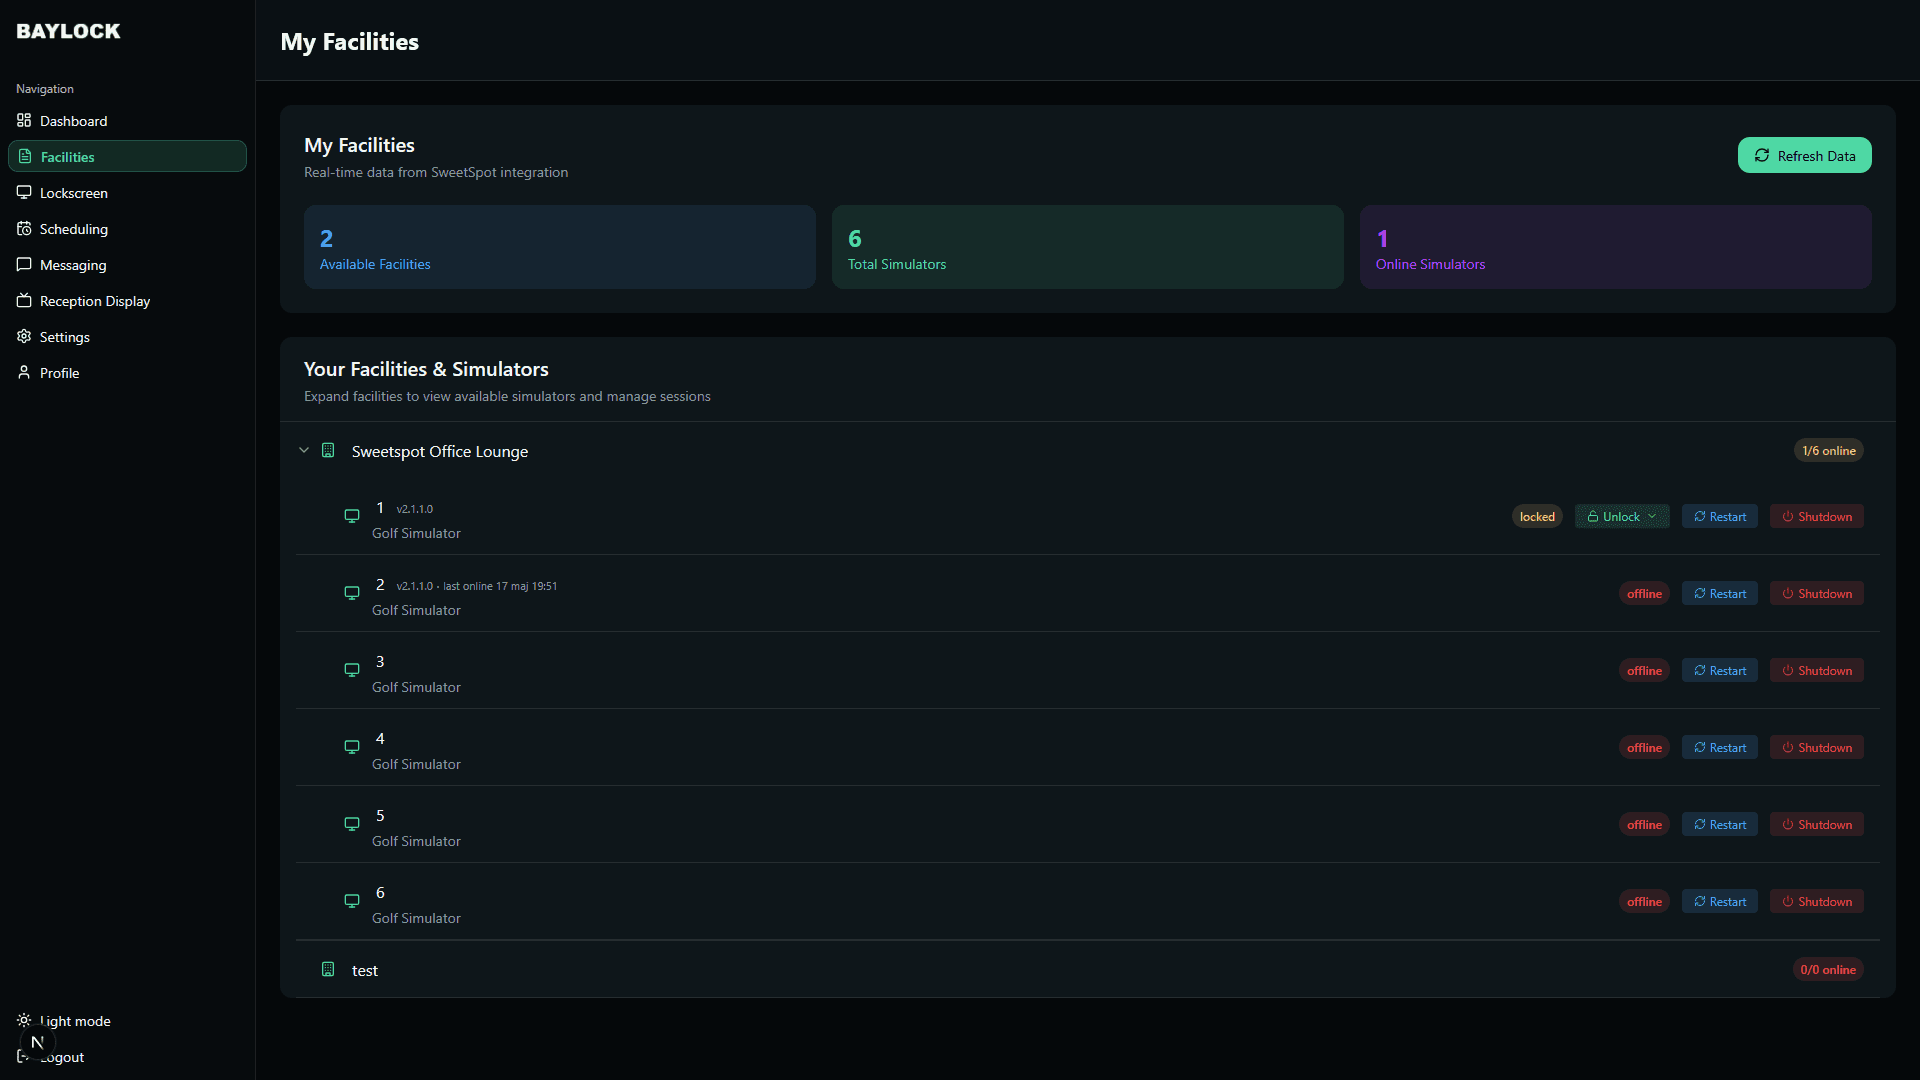
SIDEBAR → FACILITIESYour infrastructure in a tree structure: facility → simulators. Live data, refreshed automatically.
Viewing facilities
- Click on a facility row to expand it.
- This reveals all simulators within that facility, showing their name, ID and live status.
Lock / unlock a simulator
- To lock: click the "Lock" button on an operational simulator — it becomes unavailable for use.
- To unlock: click the "Unlock" button on a locked simulator to make it available again.
An offline simulator can't receive commands — bring the bay PC back online first.
Projector control (admins)
Each simulator has a projector automation toggle: Enabled (green) means projector control is active, Disabled (gray) means it's off. Click the button to switch between the two.
Refreshing data
Click "Refresh Data" to force an update from the Sweetspot integration and get the latest live statuses. Data also refreshes automatically every 60 seconds.
Facility admin guide
Facility admins manage the day-to-day operation of their assigned facilities: what the lockscreens show, when they pause, and who works there. Organisation admins have all of this too.
Lockscreen — media upload
SIDEBAR → LOCKSCREEN
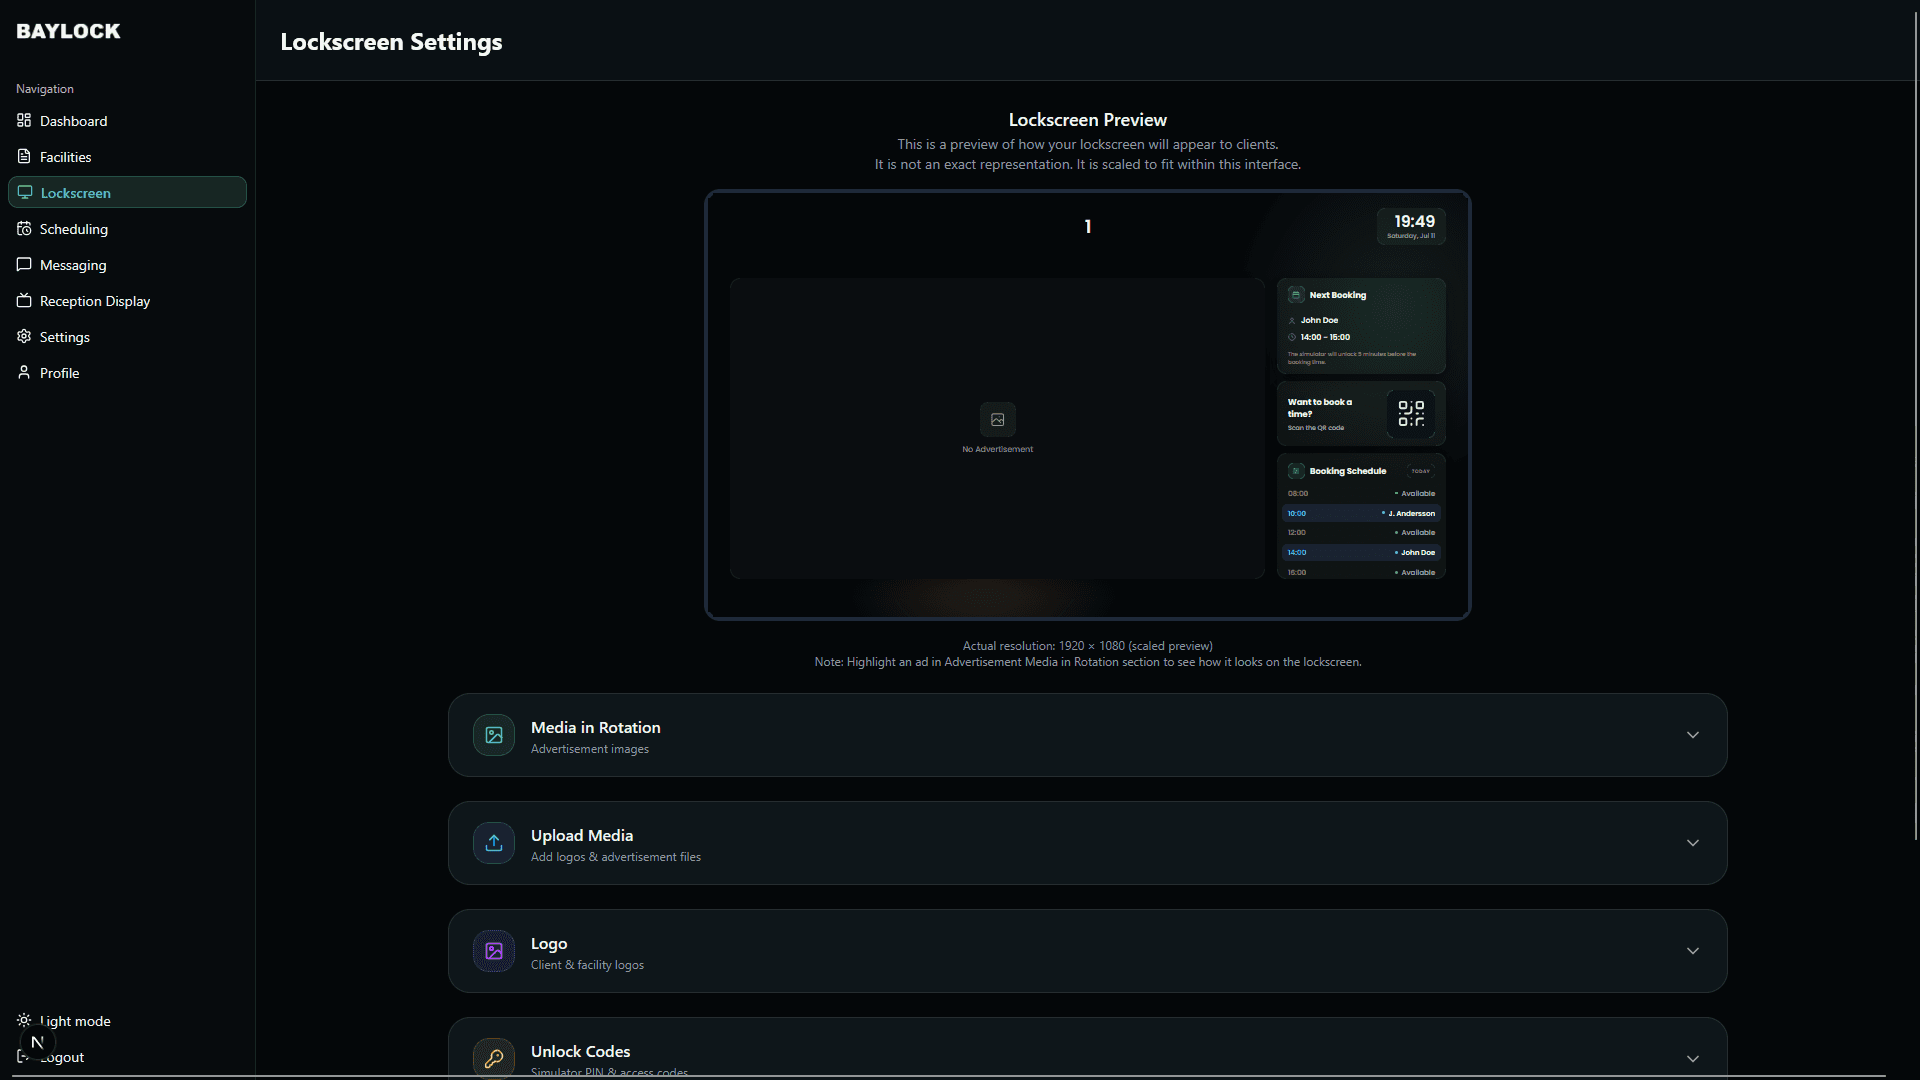
Logo (PNG, JPG, SVG — up to 50MB): click to upload, review the preview, and your logo is displayed on your lockscreens.
Advertisements (PNG, JPG up to 50MB · MP4 up to 500MB): upload the file, target specific facilities or simulators, and add a description and tags to keep things organized. Ads rotate on the lockscreen at the interval you configure.
The All Uploaded Media section lists every file with its targeting, size and upload date — delete files there when they're no longer needed.
Lockscreen — app settings
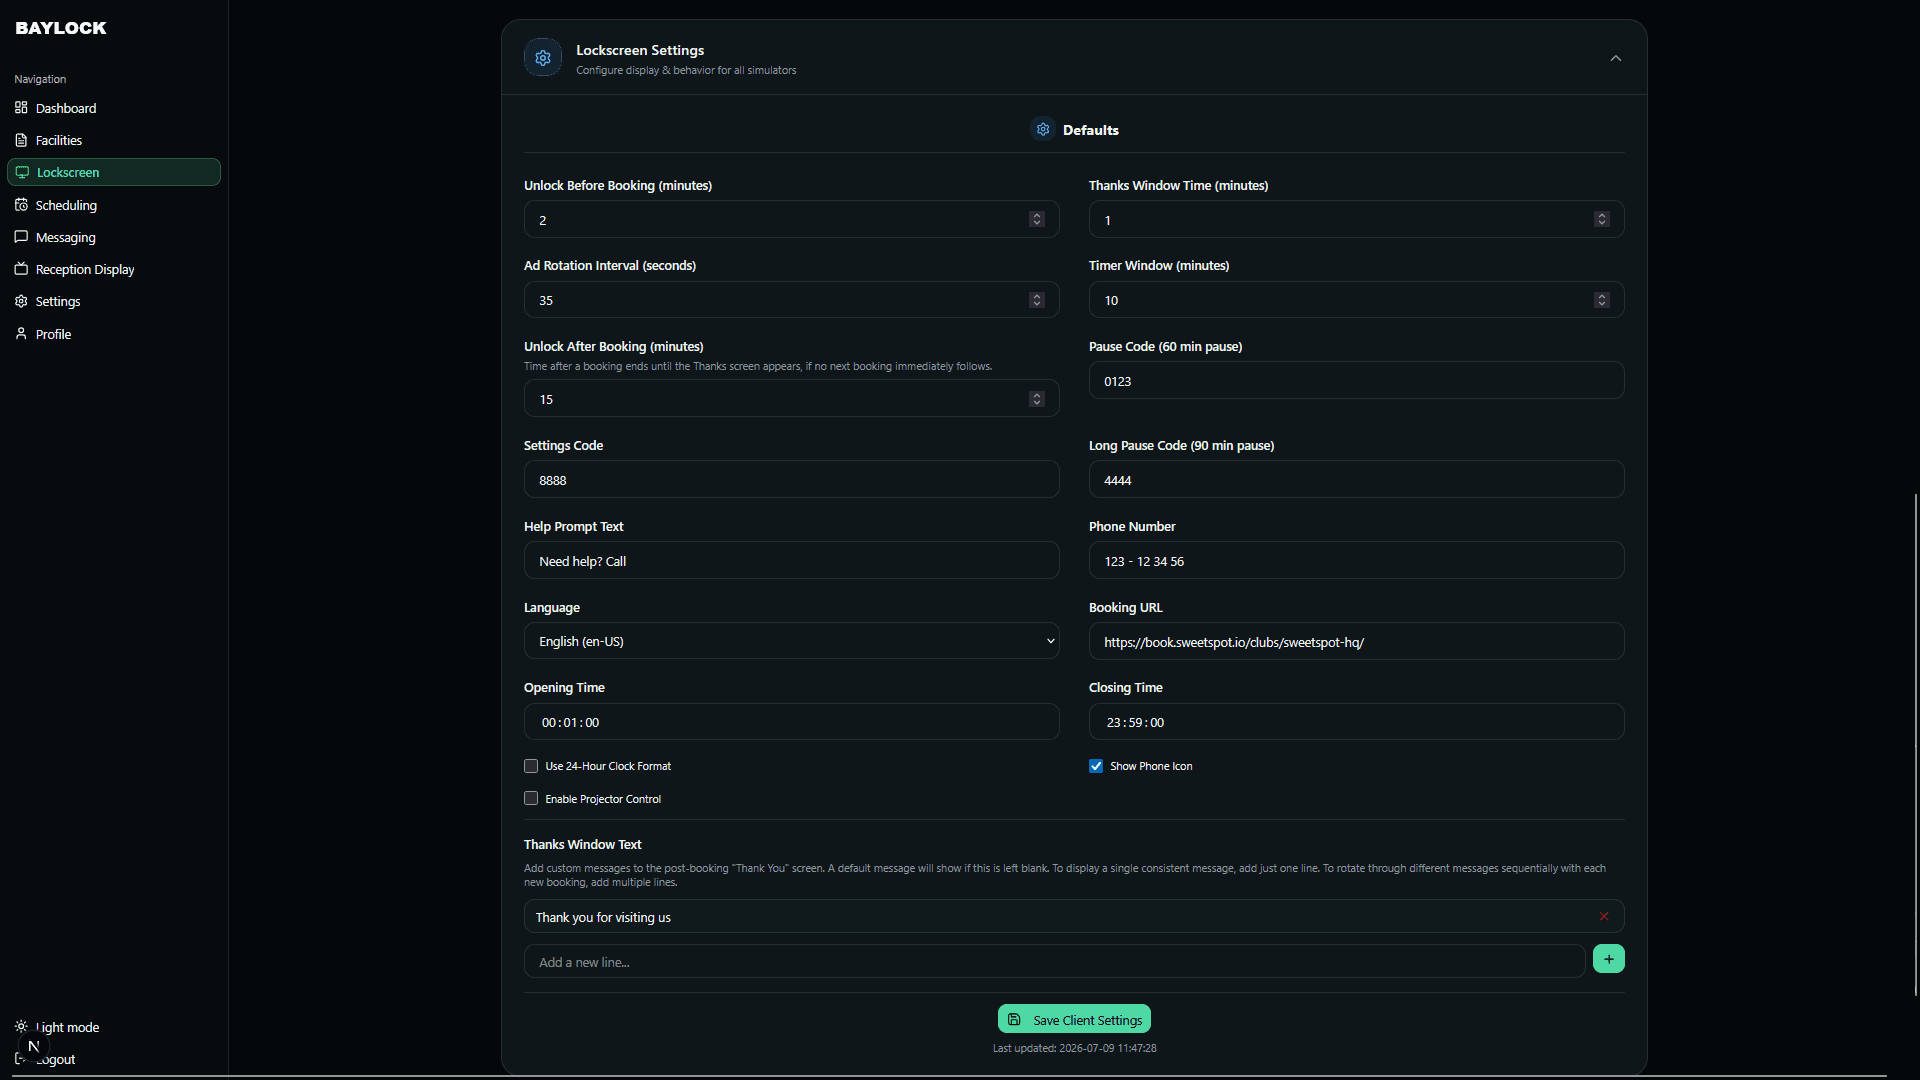
Configure how the lockscreen behaves on the bay PCs:
- Unlock before booking — minutes before a booking starts that the bay unlocks.
- Timer window — duration in minutes for the timer functionality.
- Ad rotation interval — seconds between advertisement changes.
- Access codes — a settings code, a pause code (60 min pause) and a long pause code (90 min pause) usable on the bay itself.
- Language — English or Swedish, plus a 24-hour clock option.
- Booking URL — the link behind the QR code on the lockscreen.
- Help prompt & phone number — the help text and contact number shown to guests.
- Projector control — toggle projector automation.
- Opening hours — set the daily open and close times for the facility. The lockscreen's booking schedule builds its slots from these hours, so they must be set correctly for the schedule to show the right slots.
Click "Save Client Settings" to apply. Individual simulators can be renamed, and per-simulator overrides let a single bay differ from the rest.
For the booking schedule on the lockscreen to show the correct slots, add your opening hours here.
Lockscreen — unlock codes
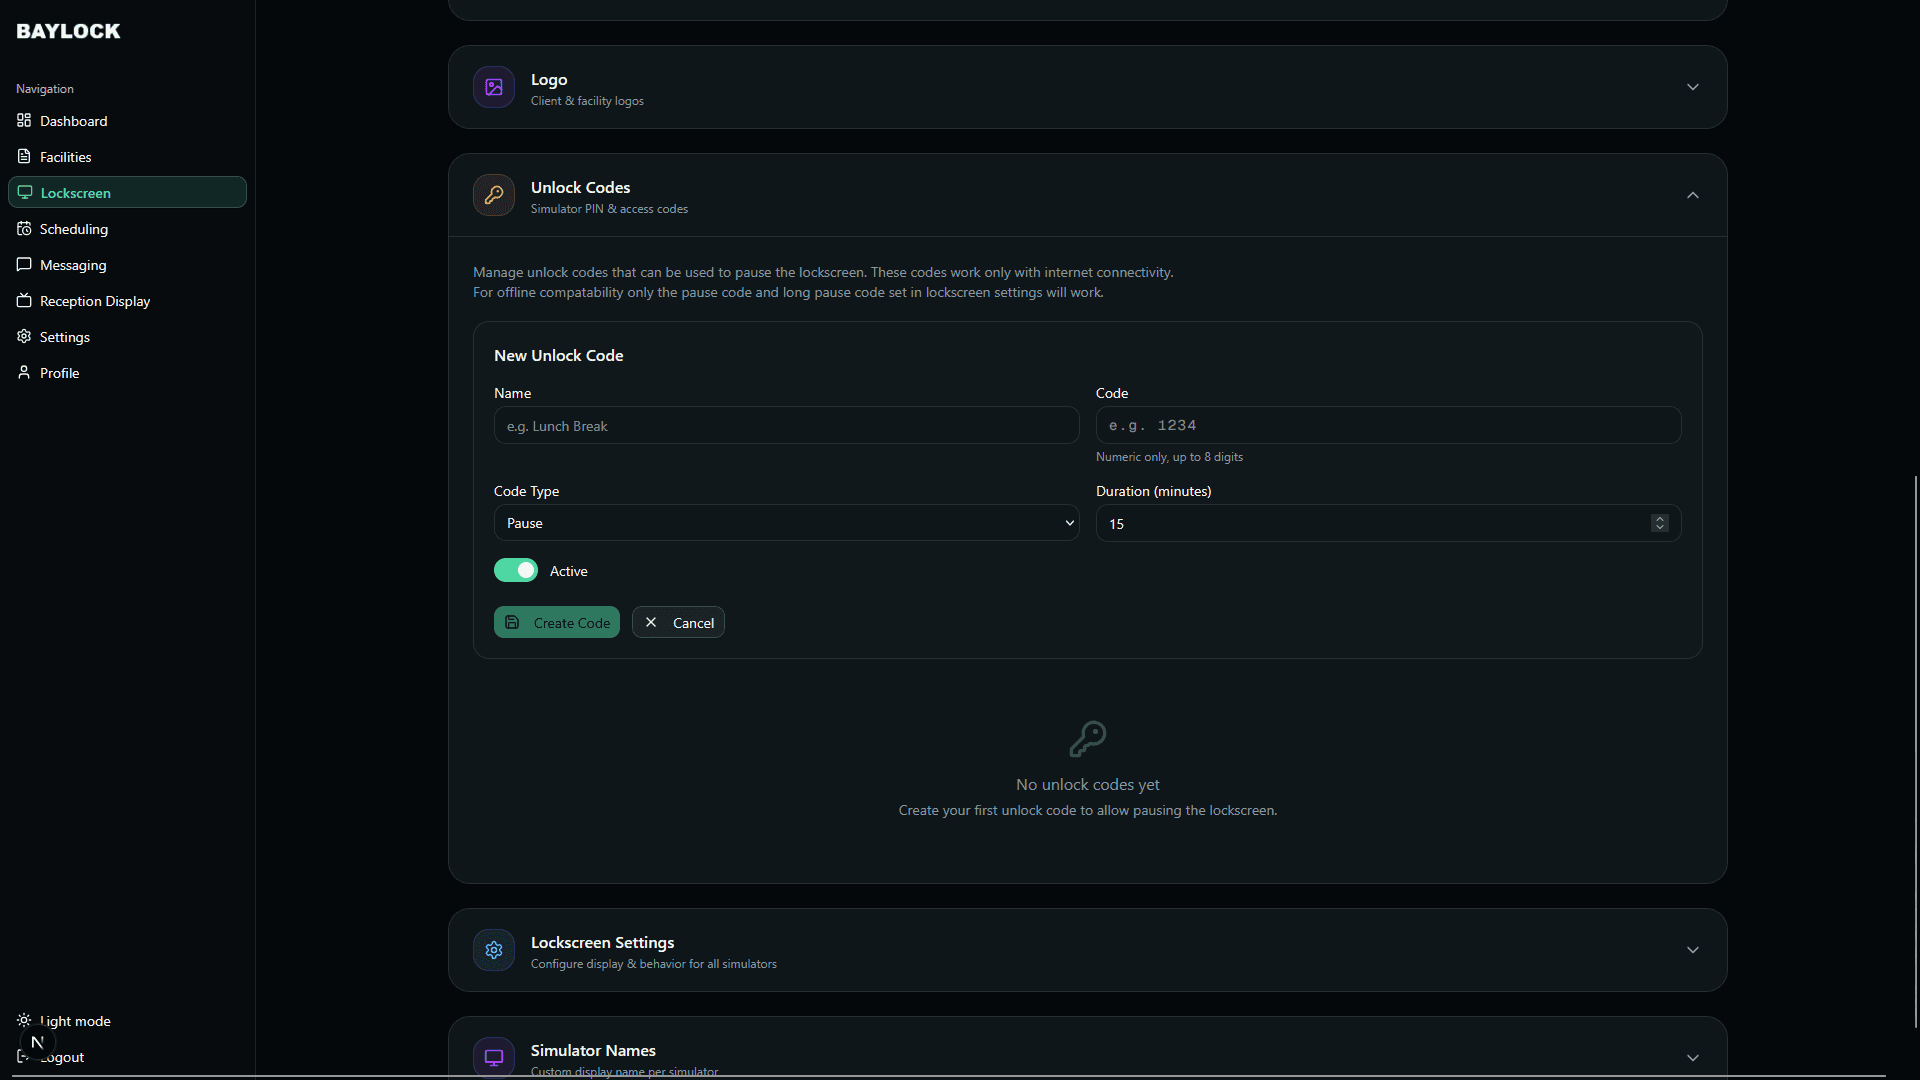
Under Unlock Codes you create numeric PIN codes (up to 8 digits) that staff and guests can type on the bay to pause the lockscreen:
- Give the code a name (e.g. "Lunch Break"), a code type and a duration in minutes.
- Toggle codes active/inactive, edit or delete them at any time.
- These codes require internet connectivity on the bay — when offline, only the pause and long pause codes from the lockscreen settings work.
Direct messaging
SIDEBAR → MESSAGING
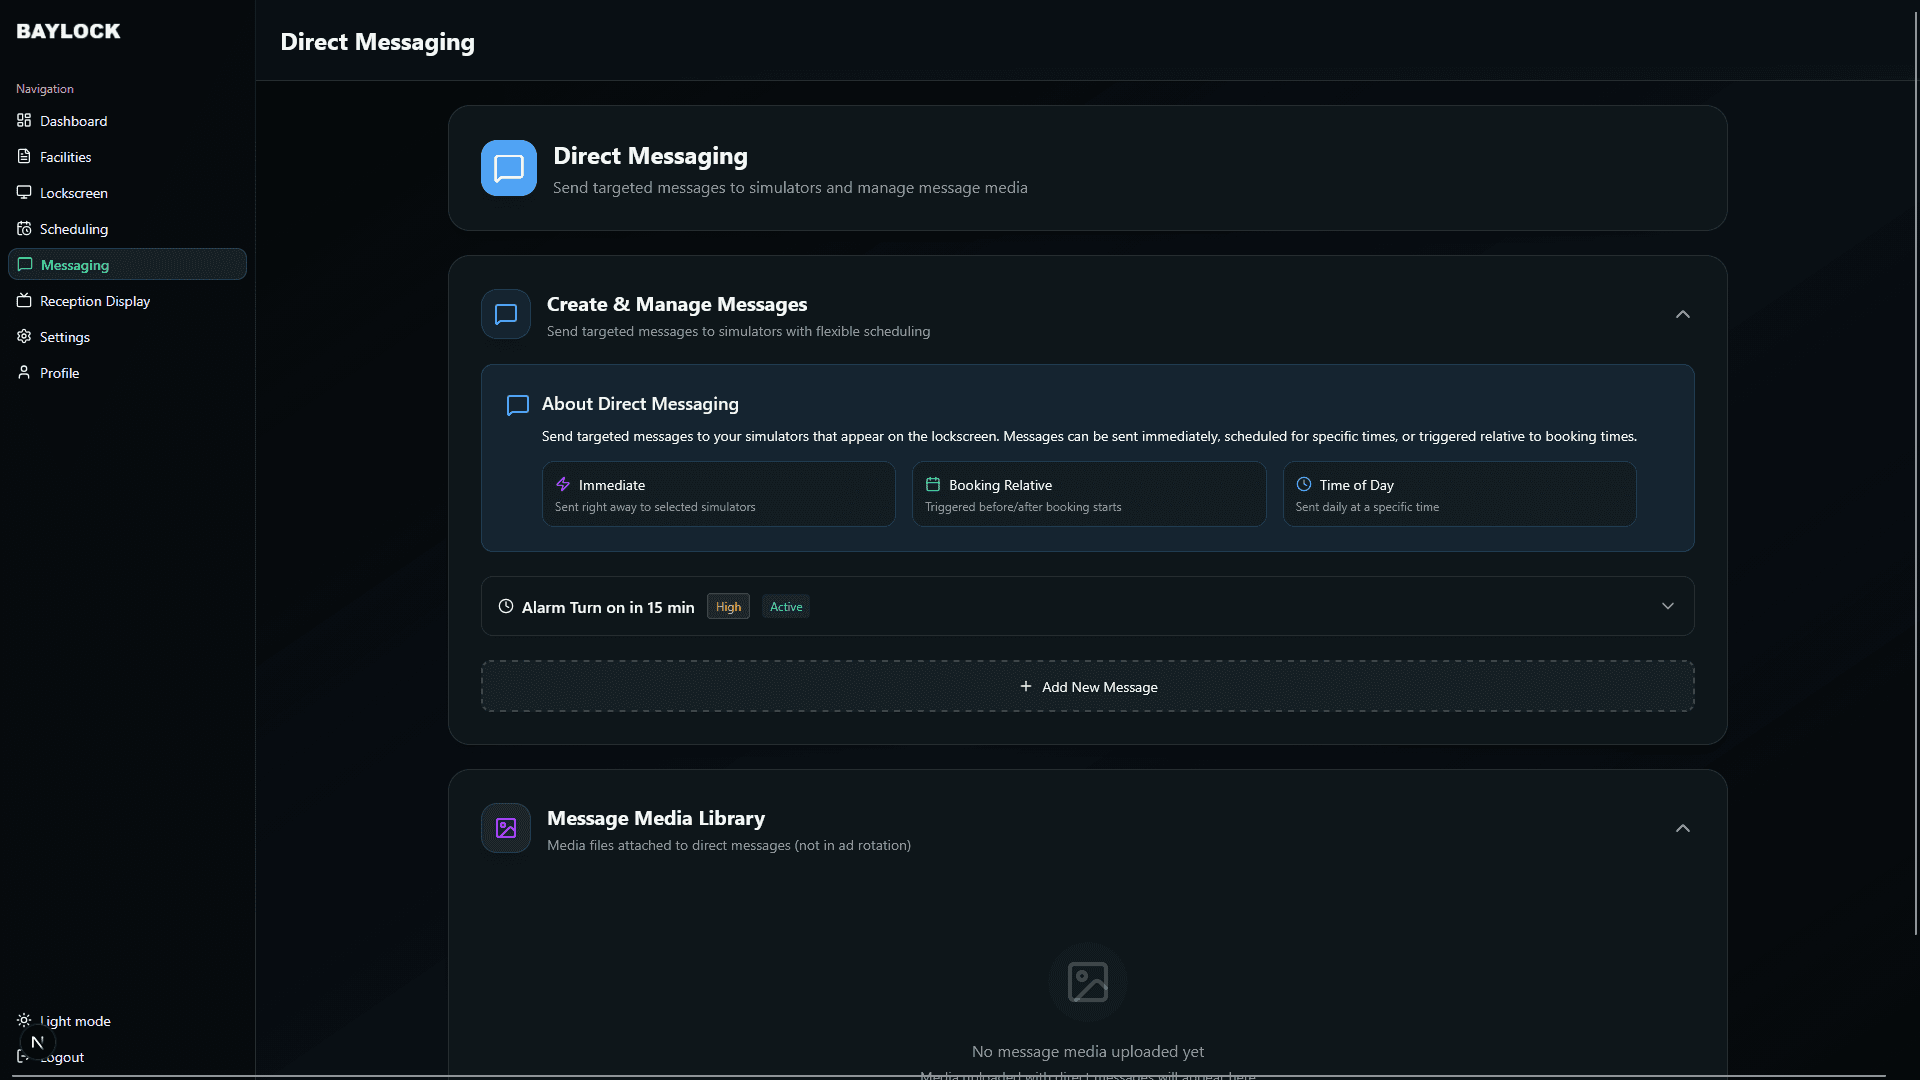
Send targeted messages that appear on the lockscreen of selected simulators. Each message has a title, content, priority (Low → Critical), display duration and a trigger type:
- Immediate — sends as soon as you click "Send Now".
- Booking relative — fires a set number of minutes before or after a booking starts or ends (e.g. "10 minutes before booking ends").
- Time of day — fires at a specific time every day.
Target a specific facility or simulator (or all of them), optionally attach an image or video, and limit the message to a date range with valid-from/valid-until. The "Active" switch must be ON for a message to send or trigger.
Screen pause scheduling
SIDEBAR → SCHEDULING
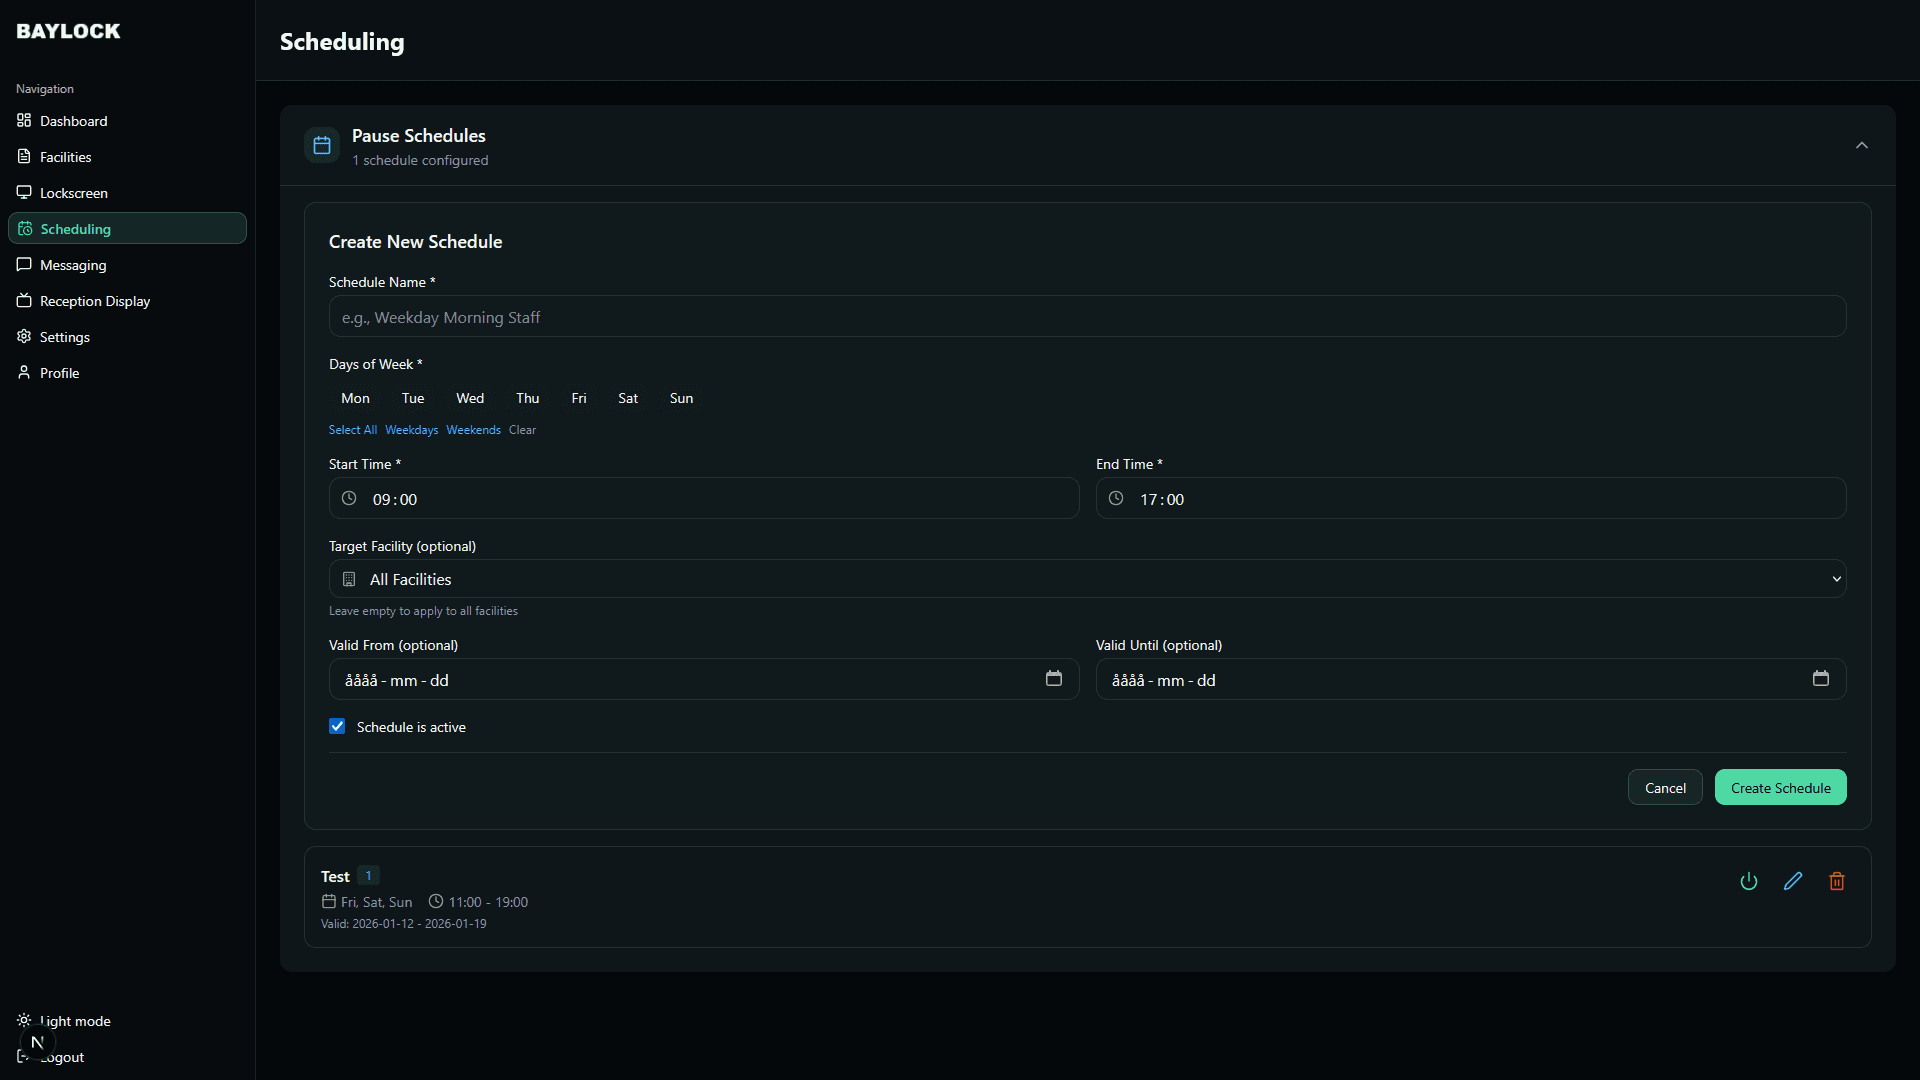
Schedule automatic screen pauses for maintenance windows, closed hours or other recurring events:
- Click "+ Add Schedule" and give it a descriptive name (e.g. "Monday Maintenance").
- Select the days of the week, the start and end time, and the time zone.
- Scope it to a facility or a specific simulator — leaving the simulator blank applies it to all.
- Optionally set valid-from/valid-until dates for temporary schedules, then save.
Schedules can be toggled active/inactive with the power icon — no need to delete one to pause it. While a schedule is active, the affected screens stay paused and resume automatically when the window ends.
Reception display
SIDEBAR → RECEPTION DISPLAY
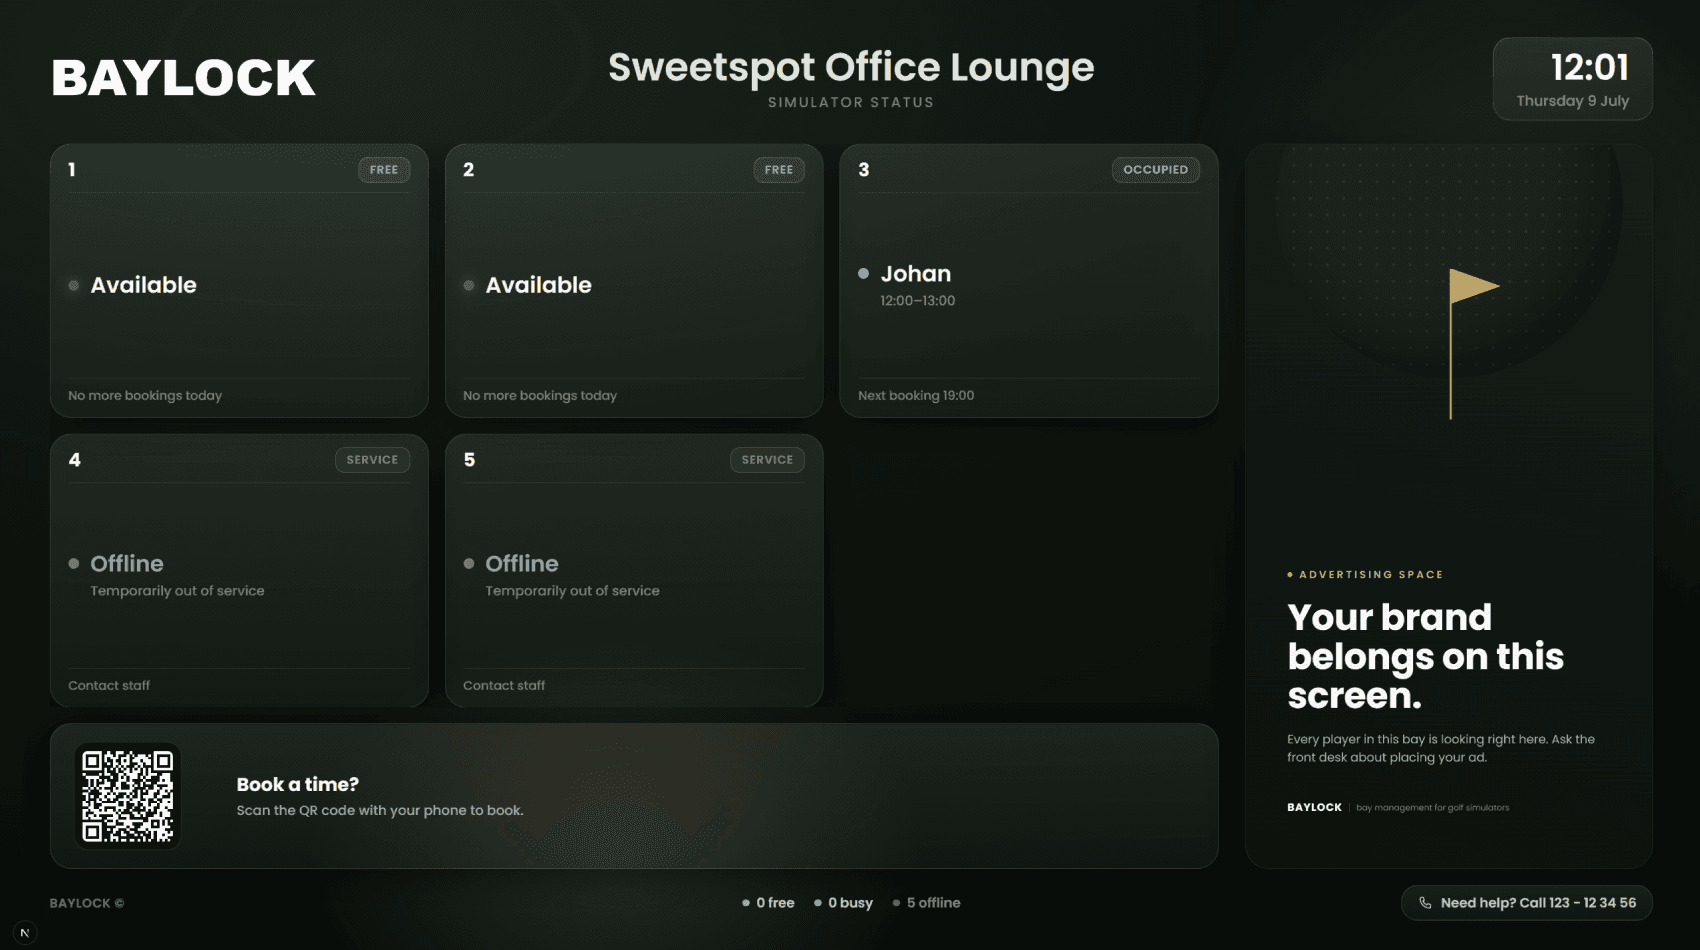
The Reception Display is a full-screen status board designed for a TV or tablet in your lobby. It shows each bay's live status and upcoming bookings, in Swedish or English.
Getting it on screen:
- Open Reception Display in the sidebar and find the facility the screen should show.
- Click Create display link — you get a permanent URL for that facility's board (landscape for TVs, portrait for standing screens).
- Open the link in the browser on the TV or signage player and put it in fullscreen.
No login on the TV: the display link carries its own access, so the screen never signs in and never gets logged out — it keeps updating for as long as it runs and survives reboots. Treat the link like a key: anyone who has it can view that facility's board (and nothing else).
If the connection drops: the board keeps showing the last known status and displays a yellow "reconnecting" notice at the top until fresh data arrives, so stale information is never shown silently.
Preview: the Preview button on the Reception Display page opens the board in your own browser while you are logged in — handy for checking the layout before walking to the TV.
Facility users
On the Users page, facility admins manage facility-scoped accounts:
- Add: fill in name plus an email and/or username. With an email, an invitation with login credentials is sent automatically; with a username only, you set the password yourself.
- Edit: click the edit icon to update a user's details.
- Delete: click the trash icon — deletion is permanent, so double-check before confirming.
Organisation admin guide
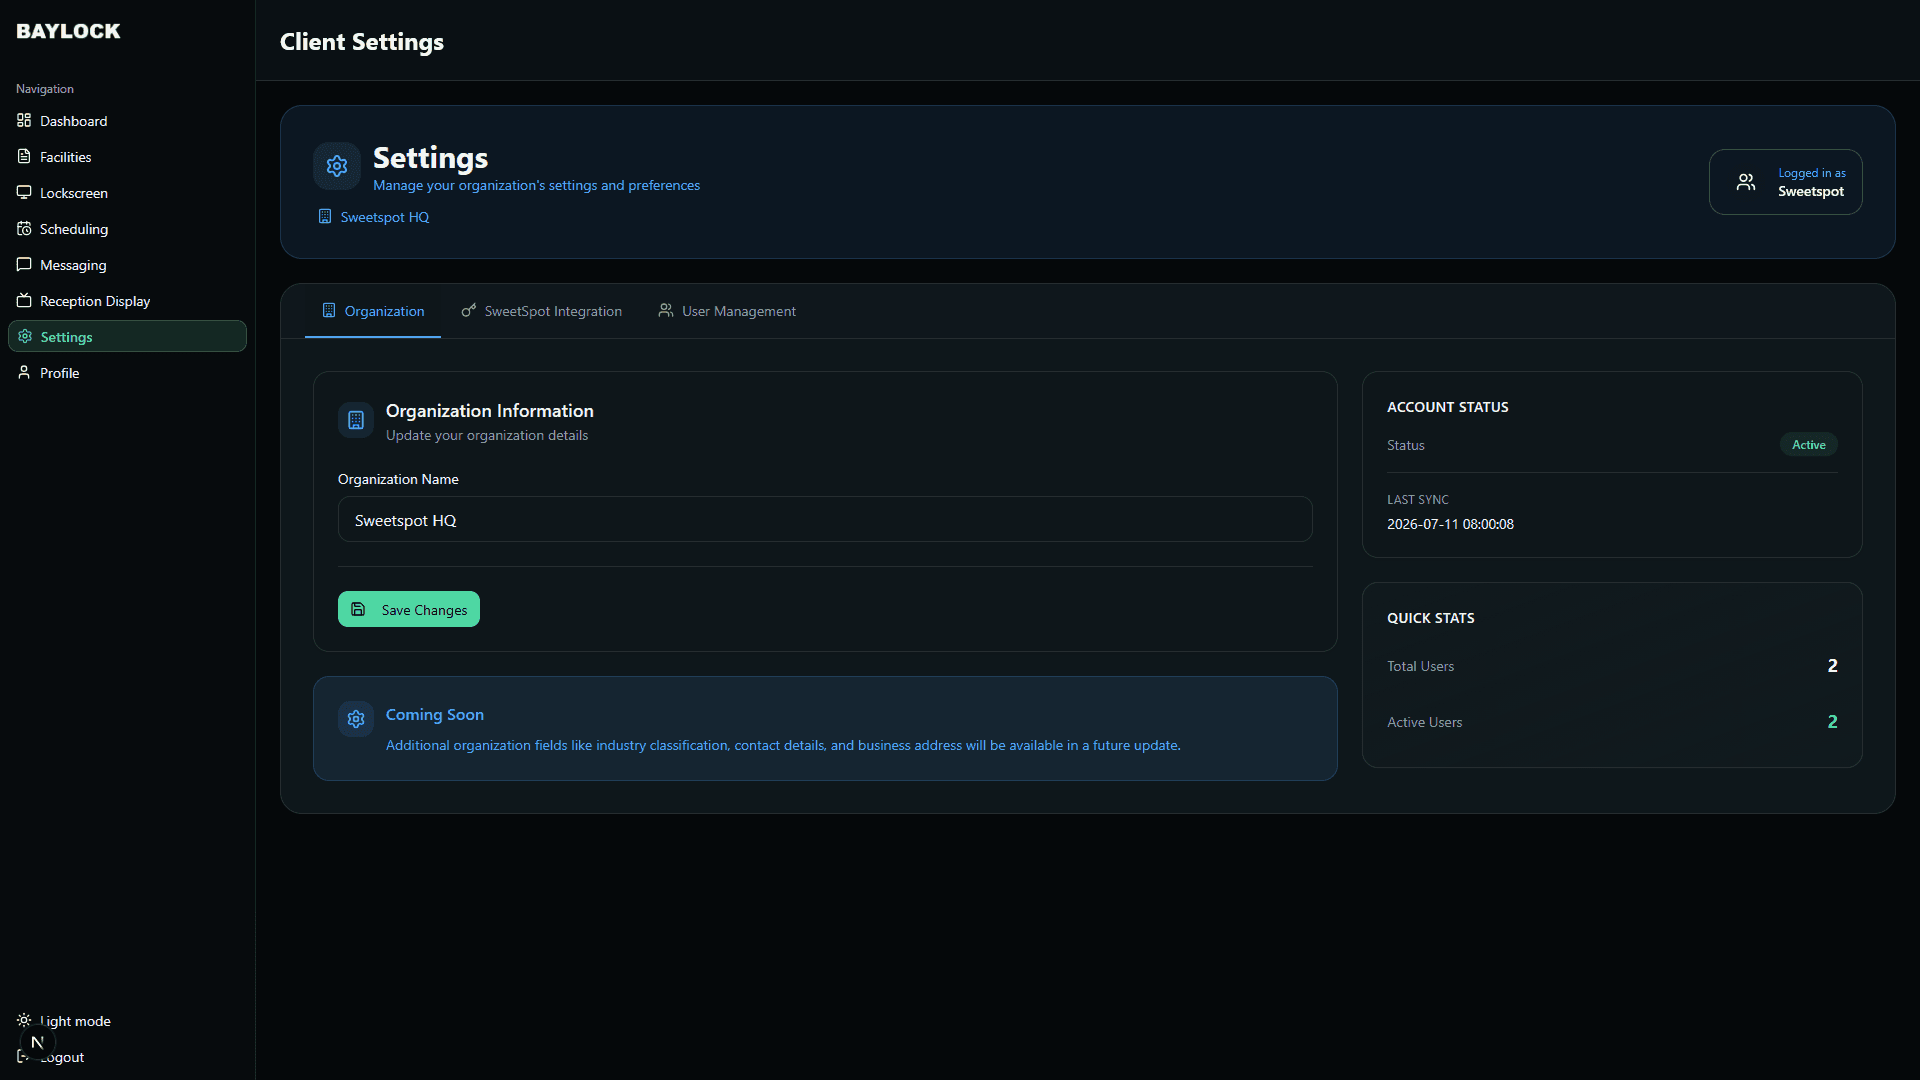
SIDEBAR → SETTINGSOrganisation admins have everything a facility admin has — across all facilities in the organization — plus the Settings page with three tabs.
Organization tab
Your organization's information — name and core details, plus account status and user stats. This is the one Settings tab facility admins can also see.
SweetSpot Integration tab
Baylock syncs bookings from Sweetspot:
- Enter your Sweetspot Client ID.
- Enter your Sweetspot Client Secret (leave empty to keep the current one).
- Click "Save & Test" to save and verify the connection in one step — "Save Credentials" saves without testing.
- Look for the green "Connected" status indicator.
Once connected, bookings flow to the lockscreens and reception display automatically.
User Management tab
Manage every account in your organization:
- Invite user: click "+ Invite User", fill in name, email and role. An invitation email with login credentials is sent to the address.
- Roles: choose facility staff, facility admin or another organisation admin — and assign facility admins to the facilities they run.
- Edit / delete: use the edit icon to change a user, the trash icon to remove one permanently.
Everything else
Lockscreen settings, scheduling, messaging, the reception display and facilities work exactly as described in the facility admin guide — the difference is that you see and manage all facilities in your organization, and you can configure per-facility overrides for facilities that have their own facility admins.
The bay app
The Baylock desktop app runs on each simulator PC and becomes its lockscreen. The web app controls it — but it has to be installed first.
Installing on a bay PC
- Download the installer from the download page (Windows 10/11, .NET 8 or later, stable internet).
- Run the .exe and follow the installation wizard — a shortcut is placed on the desktop.
- Launch Baylock and log in with your credentials.
- The bay appears in the web app within moments, and your lockscreen settings apply automatically.
First-time setup — map the simulator
After logging in for the first time, the app asks which bay it belongs to:
- On the Simulator Selection screen, select the Facility, then the specific Simulator this PC belongs to.
- Click "Save Configuration".
- Restart the application to apply the settings.
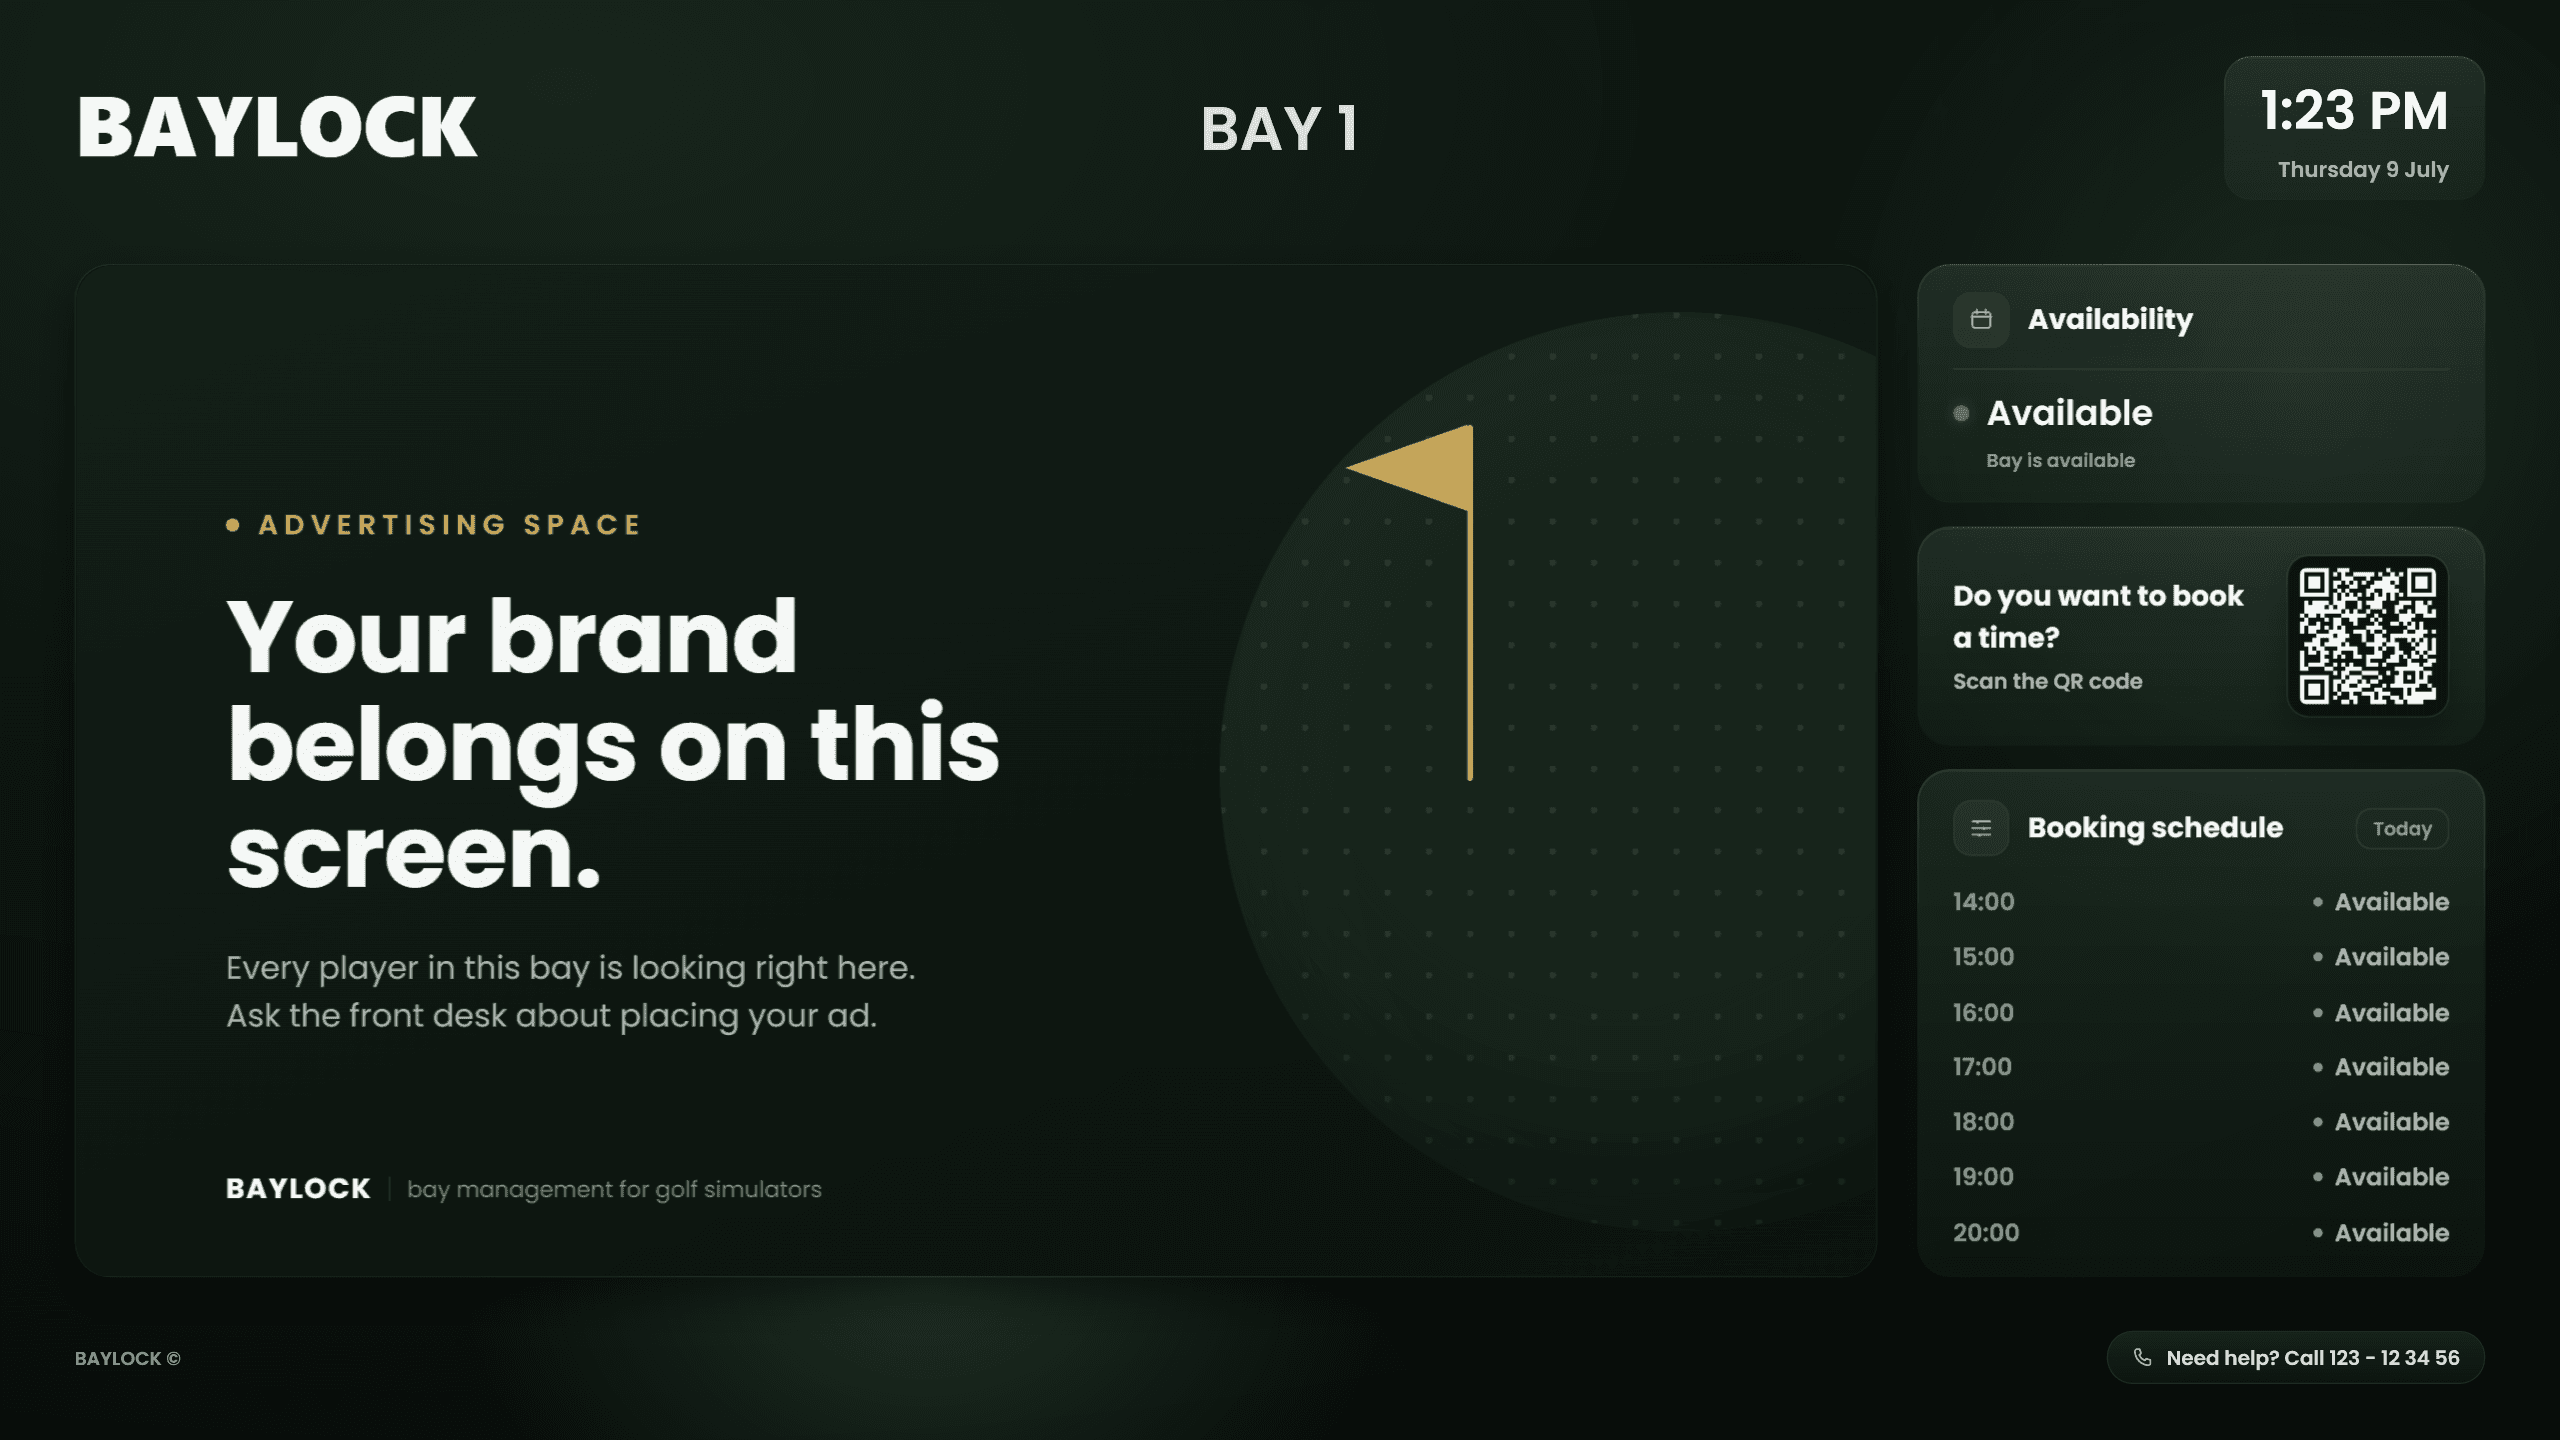
Success check — you should now see the active lockscreen with the simulator name, ads and the "Next Booking" QR code panel.
Local controls & access codes
Control the lockscreen directly on the bay PC — no web portal login needed. Click the simulator name (top-middle of the screen) to reveal the number pad overlay, then enter a code:
- Pause code (default 1234) — unlocks the screen for 60 minutes.
- Long pause code (default 5555) — unlocks the screen for 90 minutes.
- Settings code (default 9999) — opens the configuration menu where you can reassign the facility / simulator, change the clock time zone, switch light mode, log out or turn off the lockscreen.
Tip: In the simulator application, open the Settings window to update the time zone and trigger light mode directly on that bay.
Change these codes under LOCKSCREEN Settings → Access Codes before first use.
Auto-start on boot
Baylock is added to the Windows startup folder during installation — the lockscreen starts on its own when the computer turns on. If the bay PC needs time to connect to the internet first, add a startup delay with Task Scheduler:
- Open Task Scheduler and click "Create Basic Task" — name it "Baylock AutoStart".
- Trigger: When I log on. Action: Start a program — browse to the Baylock .exe, then finish the wizard.
- Right-click the task → Properties → Triggers tab → Edit → check "Delay task for" and set 2 minutes.
What the guest sees
When a bay is idle, the lockscreen shows your branding, rotating ads, the day's booking schedule and a QR code that takes walk-ins straight to your booking flow. When a booking starts, the bay unlocks for the guest — and locks again when the session ends. Staff can pause the screen on-site with the pause codes, or unlock bays remotely from the Facilities page.
Troubleshooting
| Issue | Potential solution |
|---|---|
| Cannot upload media | Verify the file size is under the limit (images up to 50MB, videos up to 500MB) and that you selected a target facility for advertisements. |
| Simulator won't lock or unlock | Check the simulator status first. If it shows "Offline" (red), commands cannot reach it — make sure the bay PC is on, the Baylock app is running and the internet connection works. |
| Sweetspot sync fails | Go to Settings → SweetSpot Integration and click "Save & Test". If the test fails, re-enter your Client ID and Client Secret. |
| Settings not saving | Ensure all required fields are filled in, then refresh the page and try again. Restart the Baylock app on the bay PC to see the changes take effect. |
| Messages not displaying | Verify the message's "Active" switch is ON, and check that the target simulators are online. |
| Schedule not triggering | Confirm the schedule is set to Active and that the days, times and time zone are configured correctly. Check any valid-from/valid-until dates. |
| "License not valid" on bay startup | The bay app shows this when the license check fails on launch. Contact support@baylock.se and we'll sort it out. |
| Can't sign in | Make sure you're using the email address (or username) your account was created with. Use "Forgot password" on the login page to receive a reset link by email, or ask your administrator to reset it for you. |
| Missing pages in the sidebar | Lockscreen, Scheduling, Messaging and the Reception Display are only available to facility admins and organisation admins. Ask your organisation admin to update your role if you need access. |